


photo F1_zpsnnecmgug.jpg photo F6_zpseunrsnjn.jpg photo F2_zps2pz6xbwz.jpg photo F4_zpsiawf8tko.jpg photo F5_zps41nt3o6b.jpg

Wednesday, November 3, 2010

░ How-to: Using E.l.f.'s Liner Sealer ░

I recently purchased E.l.f.'s Eye Primer and Liner Sealer and people have been asking me how the liner sealer works. I have incorporated a short & fast forwarded video clip for you to somehow get how it is done. Nevertheless, I am still going to explain one by one.
Photo taken by myself.
The back of the Elf Eye Primer and Liner Sealer box says:
"Liner Sealer transforms your eyeshadow into a waterproof, smudge-proof liquid eyeliner.
Use the seal side and mix your favorite eyeshadow color in with the brush 
and apply to the lash line as a liner."
Now I have my own method of using this. 
1. I line my eyes with the product (which is in clear liquid form) as I normally do with liquid liner. *Note: You will feel a cool, tingling sensation upon application of the liner sealer.
2. I get hold of a flat makeup brush and load it up with my desired eyeshadow color.
This is the smallest eyeshadow brush from my Dollface 12-Piece Brush Set in Pink (FRONT VIEW)
This is the smallest eyeshadow brush from my Dollface 12-Piece Brush Set in Pink (SIDE VIEW)
3. I pack on the color on the area where I applied the liner sealer.
I figured it would be such a hassle to mix the two together since you'll have to scrape off the eyeshadow color of your choice and then stain the brush itself since you'd be mixing with it. So I came up with my own method and hopefully you guys would benefit from this short tutorial.
The two photos below will explain what I mean by "FLAT" brush. 
Unbranded and DF Brush (SIDE VIEW)
Unbranded and DF Brush (FRONT VIEW)

The liner sealer brush would be stained (because of the eye shadow you'll be having on your lids before the application of the liner) but at least it won't be TOO stained as compared to when you'll be using the brush as a mixing tool, right? I figured that my method is much more convenient than what the box says. 


The brush visibly stained (see: below)

To remove the stains from the brush, I suggest wiping it off with makeup remover or just plain wet wipes. Watch the short clip below.
♥ Say

░ Remedies: MAC Dazzleglass "Sticky Situations" ░

Hey everyone! I didn't film anything today, I headed out and watched Paranormal Activity 2 with Paulo and his brother and screamed my head off four times. Tell me your thoughts about this movie! Anyway, enough blabber about non-makeup related stuff. 
MAC Dazzleglass *Like Venus* submerged in lukewarm water.
Tonight I did a lot of cleaning & organizing (makeup collection). I had to throw, wipe, sanitize and categorize. Yes, you may not be aware that I have this obsessive-compulsive disorder. We'll get to that soon! But this entry in mainly for my MAC Dazzleglass.
So I store it away with my other lip sticks, glosses and balms in my vanity box (lying down, horizontally)  and one day I get hold of it and get the sticky product all over my hands! Seems like the product found its way to seep through the opening, thus giving me a difficult time to clean up. I tried storing it upright, but this stuff is too sticky it won't come down that easily. Anyway, I did not want to throw it out since I still have about 1/4 left! So poof! Came into mind was Michelle Phan's "Salvaging Your Lip Gloss" video. I've blogged about this before, you can see it here. So this trick doesn't magically make your gloss increase in terms of amount or anything, it just plainly makes the gloss melt down. I recorded a short clip in ulta fast-forward motion for you to see how this trick works! The heat from the water aids in the "melting down" process of the sticky product. After a few minutes I took the gloss container out from the lukewarm water, wiped the opening with a wet towel and stored it upright to avoid the messy situation happening again!
Got the same problem? Share your thoughts and try this method!  
♥ Say

Monday, November 1, 2010

░ Beauty Tutorial: Burst of Colors ░

‎'Cause baby you're a firework, come on show 'em what you're worth. 

Make 'em go, oh oh oh, as you shoot across the sky... ♪

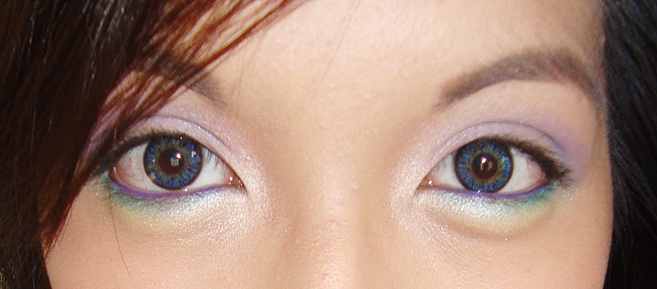
Halloween is over, and I'm back with a beauty tutorial once again. I got inspired by a Shu Uemura ad that I've seen at the Rockwell Powerplant Mall a few weeks back. I did not recreate the exact same look, though. This look would've looked more like it if I had feather lashes to go with it. This look highlights feminine features. Looking beautiful can absolutely raise the confidence bar up a notch. I will show you how to achieve this look easily. This look is dedicated to all the dreamers out there! I'm a big dreamer, if you only knew. Katy Perry's song "Firework" motivated me so much to empower people (particularly women out there) to not be afraid to dream big and show the world what they got. 
Moving on to the tutorial... (Use the numbered photos for reference)
1. Apply foundation to even out the skin tone. (I used Nichido's Stick Foundation in Beige) #11 
2. Set the foundation in with powder. (I used Maybelline's Clear Smooth Shine Free Face Powder in Honey) *You may also use loose powder. #4
3. Redefine your brows. Don't make them look too harsh, nor too soft. (I used Nichido's Eyebrow Liner Duo Kit and applied Coffee first. Then added Black 01 to make the brows look more natural.) *Don't emphasize the arches to much, we don't want intense-looking brows. #2
4. Highlight the inner corners of your eyes. (I used SHROOM by MAC) #5
5. Prime your lids, your brow bone and your lower lashline. We will be applying the eyeshadows on these areas and we want them to stay on longer and look more vibrant. (I used E.l.f.'s Studio Eye Primer) #8
------------------------------------------------------------------------------------------------------
EYESHADOW GUIDE: LOOK AT THIS PHOTO AND REFER TO THE NUMBERS FOR THE STEPS BELOW (Dollface 96 Color Palette)
6. Take a light lavender shade and apply it all over your lids #6
7. Take a darker shade of lavender and apply on the outer V area. #2
8. Blend away harsh edges.
9. We want a blue-green shade, so I mixed a shimmery green and a shimmery blue shade from the palette and came up with a blue green color (the green kind of outweighed the blue, since the blue shade I used was too light) Apply this color along your lower lashline. *Color may change in the video because of the settings. #3
10. Take a yellow shade from the palette and apply just below and on top) of the blue green shade. Blend upward. (third row from the left, third column from the left, third shade from the left)
------------------------------------------------------------------------------------------------------
11. Line your lower waterline with a deep plum eye pencil. (I used Nichido's Eye Pencil in Deep Plum) *This will totally make your eyes pop! #6
12. Line your upper waterline with a black eye pencil. (I used Nichido's Eye Contour Pencil in Blackest Black) #7
13. Apply shimmery blush on your cheeks (I used The Body Shop's Roseflower Blush 02) #1
14. Contour the nose bridge a bit (I used Ever Bilena's Cheek Blush in Earth) #3
15. Curl your lashes and apply mascara (I used Nichido's Lash Curler + Maybelline Volum'Express Hypercurl Cat Eyes Mascara) #10 and #9
16. Lastly, apply a mauvey pink color on your lips and top it off with lip gloss! (I used Beauty Treats Rose 2-in-1 Lipstick & Lipgloss in "465 Promise") #12 *I know I blogged about this earlier in my haul and said it was a lovely carnation pink shade, but I was wrong. Swatching it on the back of your hand and applying it on your lips is totally different. 
Here are photos of the swatches I made.

This lipstick+lipgloss is my current favorite! Isn't the packaging lovely? 


17. Lastly, powder your face again for a matte finish.
The brushes I used are a mix of unbranded ones and Dollface Cosmetics brushes.
Now you're ready to wear this look out! This will absolutely boost your confidence and make you stand out from the crowd. 
Now for the photo roll...


You can watch the tutorial here:
♥Say