photo F1_zpsnnecmgug.jpg photo F6_zpseunrsnjn.jpg photo F2_zps2pz6xbwz.jpg photo F4_zpsiawf8tko.jpg photo F5_zps41nt3o6b.jpg

Saturday, December 31, 2011

Side Pinned with Soft Curls Hair Tutorial

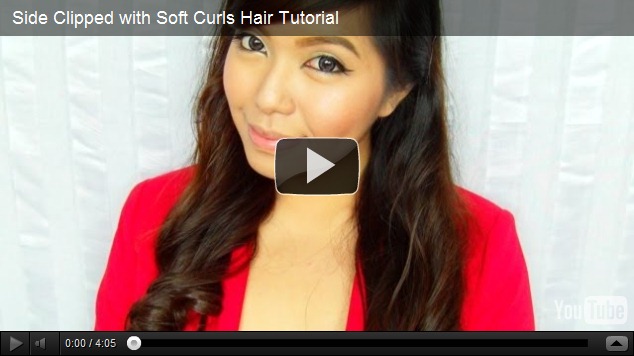
After a few weeks of mourning over the loss of 5 inches of my hair, I finally came around and started doing hair tutorials again. This is a really simple hairstyle that you can wear during any occasion. You can actually pair it with the NYE Makeup Look that I posted a day ago! You will definitely look smashing as the new year happens! And you know what they say, “How you start off the year is how the rest of your year is going to be.” (mighty superstitious)

HPIM0043

What you’re going to need:

  1. Hair dryer (VS Compact Hair Dryer) *if you’re starting off with damp hair
  2. Curling Iron (BabyLiss 25mm Sol Gel Titanium Iron) *available at SM Department Store
  3. Heat protectant cream/spray (FX Blow Out) *available at Watsons, Mall of Asia for 299.00
  4. Finishing Spray (FX Curl Booster) *available at Watsons, Mall of Asia for 299.00
  5. Teasing Comb/Rat tail comb/three-row comb (DenMan 3-Row Comb) *available at Beauty Bar
  6. Hair Brush (Goody Ouchless Comb)
  7. Bobby pins

How-to:

  1. Apply heat protectant all over your hair
  2. Dry hair completely
  3. Part your hair as you wish
  4. Detangle hair
  5. Start creating soft curls
  6. Tease curls to add volume
  7. Spray finishing spray
  8. Pin to the side creating an “X” shaped clip with 2 bobby pins

And there you have it, a simple hairstyle that is perfect for any occasion!

Watch the video here:

Friday, December 2, 2011

Messy Bun Hair Tutorial: Using the Bun Spiral by Goody!

One of the most exciting things inside the good bag that Goody gave me & the other bloggers who attended the Simple Styles Collection Launch is the Bun Spiral! We actually got different kinds of hair tools from the collection. I got the Bun Spiral in mine. I was very curious if it really does work so upon getting home and before rushing to school, I tried it! As you all know, I had past-waist length hair that time (I had a haircut this Sunday, hence the past-tense) It surprisingly held my bun up for hours! I totally loved it. I knew it wouldn’t disappoint!

Come on, it’s Goody! Remember my vlog about the things I carry inside my bag? Remember seeing my huge-ass mirror? That’s a Goody mirror! I’ve bought around 7 huge mirrors already in a span of 2 years. The quality of Goody products is undeniable.

DSC07979DSC07977DSC07981DSC07978

Here’s a simple 1:00+ minute hair tutorial on how to use the Bun Spiral! It’s easy as 1, 2, 3. You can also watch the video that I embedded below!

1. Gather your hair into a low pony tail

2. Twist the pony into a bun, tucking the ends underneath the bun

3. Take the bun spiral, and starting at the point with the purple tip, start twisting!

BUNSPIRALBUN

And voila! You have a cute bun! I like to mess it up a bit for more style. However, the better you tuck the hairs beneath the bun, the sleeker your bun will look like! It’s all about preference!

Hope this hair tutorial was helpful!

Check out the other tools from the Goody Simple Styles Collection! Run to the nearest SM Department Stores now! (Okay, not now, it’s almost 2:00AM…maybe tomorrow, perhaps?)

Huge thanks to Goody for bringing beautiful products into the world.

Here’s the video tutorial:

Tuesday, November 22, 2011

How-to: Long Lasting Curls

HPIM4535

One of the reasons why I’m still holding up a little longer on getting a haircut is because I absolutely love sporting long, wavy curls! There’s just something very va-va-voom and very feminine about it. Anyhoo, I made a better tutorial on how I curl my hair. My first hair curling tutorial was honestly not that good. So I hope this one compensates for it!

Oh yeah, and before anything else:

1. I did not rebond my hair

2. My hair color is Etude House’s Bubble Hair Coloring in Natural Brown

Now let’s move to the super simple hair tutorial on how to get long-lasting curls:

1. Air-dry/blow-dry your hair

2. Apply heat protectant spray (CPR by Monea, available at Watsons *albeit, most of the time out of stock*) –application not shown in the video–

3. Section off your hair. Left, right, top and bottom

4. Work on the bottom layer first, secure the upper section with a hair elastic/clamp

5. Curl as you would. I used my BabyLiss Sol-Gel Titanium Iron 25MM Barrel *available at SM City Manila Department Store BabyLiss Counter for 2,000+ (regular price) 1,000+(discounted price) A reader actually told me they’re on sale again, so go check it out!

6. After curling, gather up the coil of hair and pin it together, securing the first pin with another pin, creating a closed X-pattern (shown in the video)

7. After curling all the sections, spray on strong-hold hairspray—this is how they’re going to look like:

HPIM4526

8. Wait for 15 minutes

9. Release the curls

10. Run fingers through for a softer finish!

HPIM45381

I hope you enjoyed!

Watch the tutorial here:

Thursday, September 22, 2011

Wedding Hair and Makeup

I’ve received a handful of requests regarding makeup looks and hairstyles for weddings for the past months and I am now finally presenting to you my first one. I wanted this tutorial (video embedded below) to be a simple 2-in-1 tutorial showing brides on a budget simple ways of doing her own hair and makeup for her big day. 3-horzI don’t believe that bridal makeup should stay natural looking every time. As Mally Roncal of Mally Beauty said in her wedding look video tutorial with the gorgeous Judy of ItsJudytime, brides can most definitely wear smoky makeup on their wedding day. Working with colors is also another option. I created a look that would emanate a bride’s beauty, without using too less nor going overboard.HPIM3234HPIM3235Let’s start with the makeup:

  1. Be sure to prep your skin since we want the makeup to hold longer than usual and to stay on for hours (from the ceremony to the reception) *L’Oreal Base Magique Primer
  2. Primer your eyelids *Elf Eye Primer
  3. Apply concealer on areas with imperfections *LuLu Makeup Concealer in Light
  4. Apply flash-friendly foundation; use something that would not give your face a white cast when you have your photos taken *Revlon PhotoReady Makeup Foundation in Medium Beige 006 –Revlon for Less
  5. Set the foundation in with powder. Pat the brush on to seal the foundation in *Revlon PhotoReady Powder –Revlon for Less
  6. Do your brows, keep them looking defined and neat *Nichido Brown Eye Pencil and Megaga Brow Brush
  7. Take a highlight color (any white satin/shimmery eyeshadow would do) and highlight the browbone, the inner corners of the eyes and the inner thirds of the eyes. *MAC Shroom Eye Shadow
  8. Take a dark mauve eyeshadow and apply it on the outer lid area, sweep outward *LuLu Makeup Manhattan Palette
  9. Take a dark brown eyeshadow and apply it on the crease area and the outer lower lashline *LuLu Makeup Manhattan Palette
  10. Load up your brush with a sparkling white eyeshadow and dab it on the center lid area, this will give your eyes a brighter look *Shawill single eyeshadow in #5
  11. Set everything in with translucent powder. Apply on the cheeks, the T-zone, and areas where the sun would hit *Revlon PhotoReady Powder –Revlon for Less
  12. Line your eyes thinly and crisply, make the tail short and neat. *Fanny Serrano Long Wear Gel Liner in Black
  13. Curl your lashes *Elf Mechanical Lash Curler
  14. Apply waterproof mascara on the lower and upper lashes *Maybelline Hypercurl Mascara in Black
  15. Apply blush *The Body Shop Roseflower Blush 02
  16. Apply a coral/pink lip color *Maybelline ColorSensational Lipstick in Angel Rose

HPIM3245HPIM3257

Moving on to the hair:

  1. Spray the ends of your hair with heat protectant spray *Money CPR Heat Protectant Spray
  2. Tie your hair to one side of your head
  3. Separate the upper and lower section of the ponytail. Clip the upper portion away while you work on the bottom layer.
  4. Curl each section of the lower section as you would.
  5. Wrap each coil around your fingers, and take a bobby pin to stick the coil of hair to the beginning of the ponytail.
  6. Continue curling, and sticking the coils of hair to the beginning of the ponytail until you finish with the lower section.
  7. Be sure to spread the coils of hair evenly around the ponytail.
  8. Take the upper section of the ponytail (the section not curled) and wrap it around the bottom layer.
  9. You will come up with a bun filled with a group of messy curls.
  10. Secure the ends with bobby pins.

And for the last step, wear your headpiece/veil.HPIM3251HPIM3259HPIM3260HPIM3261HPIM3262There you have it! A simple hair and makeup tutorial for weddings.

Watch the tutorial here: 

Tuesday, September 13, 2011

Hair Tutorial: How I Curl My Hair (Loose Waves)

HPIM2966

What I Use:

  1. Three Row Comb (Denman, Beauty Bar, PHP 195.00)
  2. Bench Fix Professional Agent Bond Styling Gum (Watsons, PHP 95.00)
  3. Babyliss iPRO2011 SolGel Titanium Iron 25mm (Dept. Store, PHP 2,725.00)

Follow these steps and discover how I achieve loose waves for my hair:

  1. Air-dry the hair *I usually do my makeup while waiting for my hair to dry*
  2. Using a three-row comb, free your hair from any tangles *You can also use any comb available; wide-teeth combs and paddle brushes are recommended*
  3. Part your hair into two sections. *Spray heat protectant (CPR by Monea PHP 109.00)*
  4. Separate the first section into a top and bottom layer.
  5. Work on the bottom layer first; set the top layer behind you.
  6. Work on the innermost section of the bottom layer first.
  7. Curl  your hair in a temperature setting suitable for your hair texture. *I used 200 Degrees Celcius for mine*
  8. Work on the top layer next.
  9. Do the same process (4-8) on the other side of your hair.
  10. Upon reaching the bangs part, I like to curl outward for that chic style.
  11. Spread the Bench Fix Styling Gum on your palm, and scrunch your hair with product.
  12. Style accordingly.

Note: The Bench Fix Agent Bond Styling Gum doesn’t make your hair stiff; rather, it holds your curls in shape, without losing its shine and softness. The loose, wavy curls will last all day long—which is why I choose to use this product over hairsprays!

Read my post about the Bench Fix Professional Agent Bond Styling Gum here—the product that works! http://saytiocoartillero.blogspot.com/2011/09/product-that-works-holds-curls-up-for.html

Watch the tutorial here:

Friday, June 24, 2011

KarminMusic’s Amy Heidemann: Suicide Roll Hairstyle Tutorial

HPIM2291-horzA quick tutorial on how to do the Suicide Roll which is worn by Amy Heidemann of KarminMusic so often. I have received a couple of requests on how to do this hairstyle after I posted the KarminMusic Amy Heidemann Inspired Makeup Look and I finally found the time to do it.

Things you need:

  1. Bobby pins (I only used 3 pins)
  2. Hairspray (I used Etude House’s Sweet Style ULTRA Hard Hairspray)
  3. Tail comb (For teasing and smoothing out the hair)
  4. Patience

Procedures:

  1. Gather a portion of your hair on the bangs area.
  2. Back comb your hair to create volume
  3. Smooth out the top area
  4. Wrap the lock of hair around your index finger
  5. Carefully take your finger out while securing the rolled hair
  6. Find the center of the roll and stick the first pin in it
  7. Continue securing the roll until desired shape is achieved
  8. Spray on hairspray

And there you have it! The “Suicide Roll” inspired by the beautiful Amy Heidemann of Karmin.

Watch the tutorial here:

And if by any chance you still haven’t watched the makeup tutorial I did inspired by Amy, here it is:


Sunday, February 6, 2011

░ Hair Tutorial: Easy Soft Curls ░

Here is a simple tutorial on how to achieve easy, soft curls using a hair straightener.
I used my JML ProCeramicStraightener, it has ceramic plates which heat up in just a matter of 2 minutes! Be careful when handling this since it becomes very, very hot, I tell you!
Now I know I have done a makeup and hair tutorial before using this straightener, but this time, I used the flip-outward method which I learned from Judy of ItsJudyTime (whom I met recently, and I still can't get over it). So, I was watching one of her videos the other night and decided 'maybe I should try this...' It ended up looking really amazing! So I now know that flipping outward is better than flipping inward, as least for me. I hope you don't mind, I only uploaded (1) photo for this tutorial. The other shots looked bad. My makeup was actually melting away in the video because of the heat from the straightener. I looked really tired in this video so  please pardon me, I'm still a little sick.
Steps in achieving easy and soft curls:
CLAMP.
FLIP OUTWARD.
DRAG DOWN.

Enjoy the video: